Monday, November 19, 2012

The Lavender in Frost

Forgive me for not posting much over the last several months about the lavender. Not much to report accept that they are growing. The lavender ladies I planted in June are well prepared for winter, all between softball and cantalope sized, and many threw up a few blooms in late September, a really beautiful willowy stem so I am excited for next year.
The hungarian lavenders, I'm a little more worried about. All of them burnt up in the drought despite my watering and M and I had to replant in the middle of September.
Up until the time change, I was diligently placing buckets over the young plants on frost risk nights, and I left work early the night before Sandy hit and dumped a bit of snow on the ground. Now it is getting hard to bucket them and I have to hope that after 8 weeks and with these warm days, the roots are established enough to weather the Ohio winter. Hungarian lavenders would have to be hardy right?
Here are some more frost gilt lavender plants, mostly the Croxton's wild, that look very nice after the big prune I gave them this summer.
There will be several projects in the spring outside of planting and I'll let you know when posts are up.

Thursday, June 28, 2012

Lavender Plant 2012

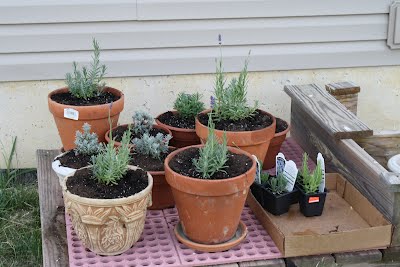
On the weekend of June 15th, 16th and 17th, Dad and Andrew helped me plant 34 new lavender plants. Most of these are tiny plants grown by my friend M. The lavender ladies were grown from cuttings and the Hungarian lavenders were grown from seed. M can grow just about anything and this saved me a ton of money. Other lavenders planted were two varieties I bought from a nursery in Asheville, Lodden Blue (which I've wanted for ages) and Ellegance purple. Ellegance is a newer variety that I saw the "Ellegance Skye" variant at Lowe's and Home Depot this spring. I also have a single Lavance that M bought at a plant sale and a couple of Vinceza Blues. Every year I do things a little differently based on what I learned the previous year or what I have read. This year got even more technical with equipment. Below is the lavender plant step by step, as well as I could photograph it while we worked on the project. Marking and Measuring Mom took this picture of Dad and I measuring out the spacing for the holes and marking them with spray paint. The chickens came over to help.
Holes in the Heat Hardened Ground Because the ground is super, super hard because of the lack of rain, digging holes was a daunting proposition. Add that I wanted to make bigger holes this year and that only meant one thing...an auger! Dad is using this auger we rented from a local plumbing/septic professional with his skid loader.
Why bigger holes? I read in the newest lavender book out there (The Lavender Lover's Handbook) that when growing lavender in clay soil, mixing the soil with mushroom compost is an immense boost for the plants. Mushroom compost, as well as I understand it, is compost that mushrooms have been grown in, then steamed (to kill off any remaining spores) once the mushrooms are harvested. So the compost can still act as a fertilizer but has a much lower nitrogen content. Lavender does not like a lot of nitrogen so this is a good fertilizer for it, but when mixed with clay soil, the mushroom compost actually breaks up the clay, which helps the lavender roots breath and not get trapped in a lot of moisture. When we planted the lavender, Dad brought over a cement mixer that we plugged in with an extension cord to mix the mushroom compost and the clay soil dug up from the auger. A great side benefit to using the auger, is that it ground up the dirt into very loose grainy pieces, perfect for these holes! The Lavender Lover's Handbook also recommended digging a hole 12 inches in diametere as that is the reach most full grown lavender plant roots will spread. The auger made this easy work. I'll be anxious to see if I notice a different in theseplants perfomrance over the years. Getting the Gravel On the 15th after the holes were dug, Dad and I went into Urbana and got almost 5 tons of limestone #8, a small fine grade gravel. As mentioned before, gravel helps keep moisture from collecting at the base of the plant and reflects heat and light into the plant to keep it dry.
Laying the Fabric I almost bought black plastic this year, the ultimate barrier for weeds, but read in Fine Gardening that black plastic kills beneficial organisms in the dirt so I went with fabric again and this was the most challenging part this year because the ground was so hard I was throwing away just as many bent anchor pins as I was getting in the ground. It was super hot that day and this is as far as I got before going into the house in frustration.
HOles Graveled Later that evening I rethought my process. Dad and Andrew were going to help me plant and then we were going to gravel but after the toiling earlier in the day, and realizing that 42 open holes was pretty much a death trap. So we graveled what I had down, then Dad and I held down fabric while Andrew weighed it down with gravel then it could be covered. I used scissor to cut X's over the holes do we could see them and also to minimize that gaps in the fabric once the plants were planted.
Below is a Hungarian lavender plant grown from a seed by my gardening genius friend M. Notice how it seems to be elevated a little bit. that is my attempt to plant it on a mound, as the dirt will settle over the coming weeks.
Below is a row of the Hungarians, 8 more holes covered with roof shingles are waiting for the smaller plants to be ready to go in.
Once the plants were in the dirt, I cut out circles from the landscape fabric, folded them over into a half circle, and cut a quarter sized hole in the fabric (thinking makind snowflakes out of construction paper) to slip over the plant to keep the weeds down. I called it "bibbing" them and it is a term I completely made up. I hope you like it.
Below is one of the Lodden Blues I bought on vacation, thriving. You can see it is graveled all around. I'll be watering the plants lightly through this heat wave and they should triple in size, maybe even quadruple by the end of July. The tiny Hungarians and Lavender Ladies will especially have to grow exponentially to survive winter...we'll see.
I hope you have enjoyed this post, it is a lot of steps I know and the gravel will never look this prisitine again. I have another great post lined up showing a more complete picture of the first round of harvesting and I have some other news about Black Lab Lavender making an experimental retail debut so stay tuned and thanks for following. Jules

Tuesday, June 12, 2012

From the Harvest

Well I've been cutting lavender every couple nights. The Hidcote Giants are the last to bloom and I'll be cutting them off later this week. ALso, it looks like this year's lavender plant will be this weekend. I'll be planting 24 plants. Because it has been so dry and because I am trying something different this year, I am renting an auger to make the holes, but more on that when I do that post. Here is how the Lavender is shaping up this year. Grossos in the back, planted two years ago. Cynthia Johnsons in the front, planted last year. Molly and a Grosso bundle. Molly checks out the early harvest tried, Munstead, Hidcote, Niagara, Croxton's and Tucker's Early Purple. Here are those Marge Clark's planted last year. From scrawny to showy! They also dry a very pretty blue.

Bees and Blooms

Most of these are from the ornamental (read not very fragrant)lavenders I have in the herb garden. I let them go completely for the bees. I have about 30 plants in the back that I did let go for the bees, the mystery variety, the croxton's and a couple munsteads and hidcotes. I could take pictures of bees all day. They move fast, staying on a bloom for just a few seconds. These were done with my macro lens. Note the orange on this bees leg. This part of the leg is considered the "pollen basket" The next two pictures aren't about the bee but the bloom. I just really liked the detail. The butterflies are even harder to catch as I think they are pretty flighty (pardon the pun) I think I kept casting a shadow or something and they thought I was a bird. Maybe later I can get more...

Tuesday, May 29, 2012

I've been too busy cutting lavender...

to post about it! All the varieties are blooming right now. I'm having trouble keeping up and some of the plants that are throwing up reedy wands, I'm just mowing them down. I have over 50 bunches drying now. Grossos and Marge Clarks (the longest so far as they are intermedia lavenders) should be ready to cut this weekend. Lots of pictures and descriptions below:
So the picture above of the Grossos, and the basket is placed there for a sense of scale. The Grossos are less like a ball like the English Lavender, with the bulk of the plant staying low, and the wands/stems, growing tall and away from the plant. Grosso is the variety that a lot of the lavender fragrance comes from when you buy stuff. It has a higher camphor content and a strong, strong scent.
I'm excited to see what the Marge Clarks do this year. They were so scraggly when I planted them last year, I really wasn't impressed but they do have a beautiful form, we should know more about how they look this weekend.
Above is an example of what a plant looks like after I've mowed it down, it is about 6 inches off the ground now. I should really cut it down to four inches, but I am still a timid pruner. This is one of the munsteads that was a little puny so I just trimmed it up to put the time on some of the larger plants.
I took the picture above on Memorial Day, you can see some of the purple, I hope it will look even stronger next year.
Here is a view of the Cynthia Johnsons from the top. I think they may be my favorite after the Tucker's Early Purple. They have a very interesting pattern to them. Below, is a bunch ready to hang.
The Lavenders in pots below are mostly the ones I found at the Jesse Israel and Sons nursery in Asheville. The silvery blue ones that are shorter are Lodden Blues and the willowy tall ones that are blooming are Ellegance Purple (for some reason this year, the Ellagances are very popular and you can find Ellagance Sky at Home Depot and Lowes. Sky is a lighter purple.) The richer green one in the back is a Lavance that my friend M bought at a plant sale in Columbus and the little guys in the black pots are Vincenza Blues. I am hoping we will get some hard rain in mid June so I can plant them on my weekend off.
And I'll leave this post with one last picture, Molly supervising the drying in the family room.

Wednesday, May 9, 2012

The First Lavender of the Year is Here!

And it's not the Tucker's Early Purple, although they are going great. It's the mystery variety, that I bought labeled Provence, but they ARE NOT Provence.

BUDS ARE HERE

Chickens in the Lavender

If you've been following (and you should be you know.) Then you have learned that chickens like to roll in dirt and dust because it clogs the lungs of many parasites. Well, the other day I was finishing up weeding the lavender and the chickens were out ranging and they discovered the gravel around the plants. I had to use my foot to sweep the gravel back into place, but at least they didn't tear up the landscape fabric.

Pruning, Weeding, Burning and Budding

Lots going on in the lavender rows. I've finished pruning the winter die back, essentially any part of the plant that has greened up at this point: Here is the Croxton's before pruning:
Most of the winter die back was in the plants planted last year. I did end up ripping that Hidcote giant out too. Here is a Marge Clark before pruning:
The last Sunday in April, Dad came over and he and Andrew burned all the weeds and grass between the plants. Andrew used plywood to block the heat from the lavender and Dad used a propane tank (like for a grill) strapped to a dolly and he had an attachment that just wilted the weeds. I don't have a picture of this because while they were doing it I was in town getting stuff for the chickens and when I came back I helped them. There are few things as demoralizing to me this time of year, as seeing the grass out of control around the lavender. It looks sloppy and it holds moisture. This spring, when I add varieties, I will be planting them between the existing rows and then graveling them. You will see this process at the end of May. But this is what it looked like at the end of the day.
And yes, that's a cement deer in the background, it's a story for another blog entry. Here's another shot, notice the fence board in the background that it broken in the middle. That is the last remnant the storm we had last May that led to some damage on the homestead.

Saturday, April 21, 2012

Updates Week of April 23rd

Here is the Munstead, the one that has been in the ground for it's third year.
And here is Tucker's Early Purple, my favorite of all the varieties that I bought last year.
And the Provence, slowly, slowly coming along.
More updates below.